Aliasing
Digital sampling of any signal, whether sound, digital photographs, or other, can result in apparent signals at frequencies well below anything present in the original. Aliasing occurs when a signal is sampled at a less than twice the highest frequency present in the signal. If an audio signal of containing a ultrasonic 45 kHz tone is sampled at 44.75 kHz, the resulting signal contains a 0.25 kHz tone, approximately middle C!
The following figure illustrates what happens if a signal is sampled at regular time intervals that are slightly less often than once per period of the original signal. The blue curve is the original signal, and the red dots indicate the sampled values.
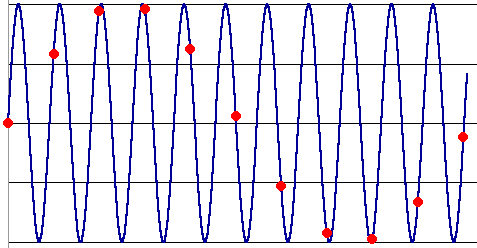
The red dots are what are recorded, since they represent the signal values at the times the signal is sampled. The pattern of the red dots is a terrible representation of the signal. The red sampled data looks like a sine wave at about one-tenth the frequency of the original! This is aliasing.
Were nothing done to control aliasing, the effect on musical recordings would be devastating. In the above case, the presence of an ultrasonic harmonic in the signal from the microphone would result in a low pitched tone present in playback. Signals at frequencies above half the sampling rate must be filtered out to avoid the creation of signals at frequencies not present in the original sound. Thus digital sound recording equipment contains low-pass filters that remove any signals above half the sampling frequency.
Aliasing can also cause problems in digital imaging. In images, the repetition is in space rather than time. If a repetitive pattern of high spatial frequency is sampled at low resolution, Moire patterns result. These are particularly troublesome when scanning half-tone magazine or newspaper photos, where the dot spacing may be as high or higher than the sampling frequency.
The phenomenon is most easily understood with a regularly repeating subject. In the discussion below, I have created aliasing using a "pixel resize" in Paint Shop Pro. The effect is the same as if one were to take a digital photo without antialias filtering.
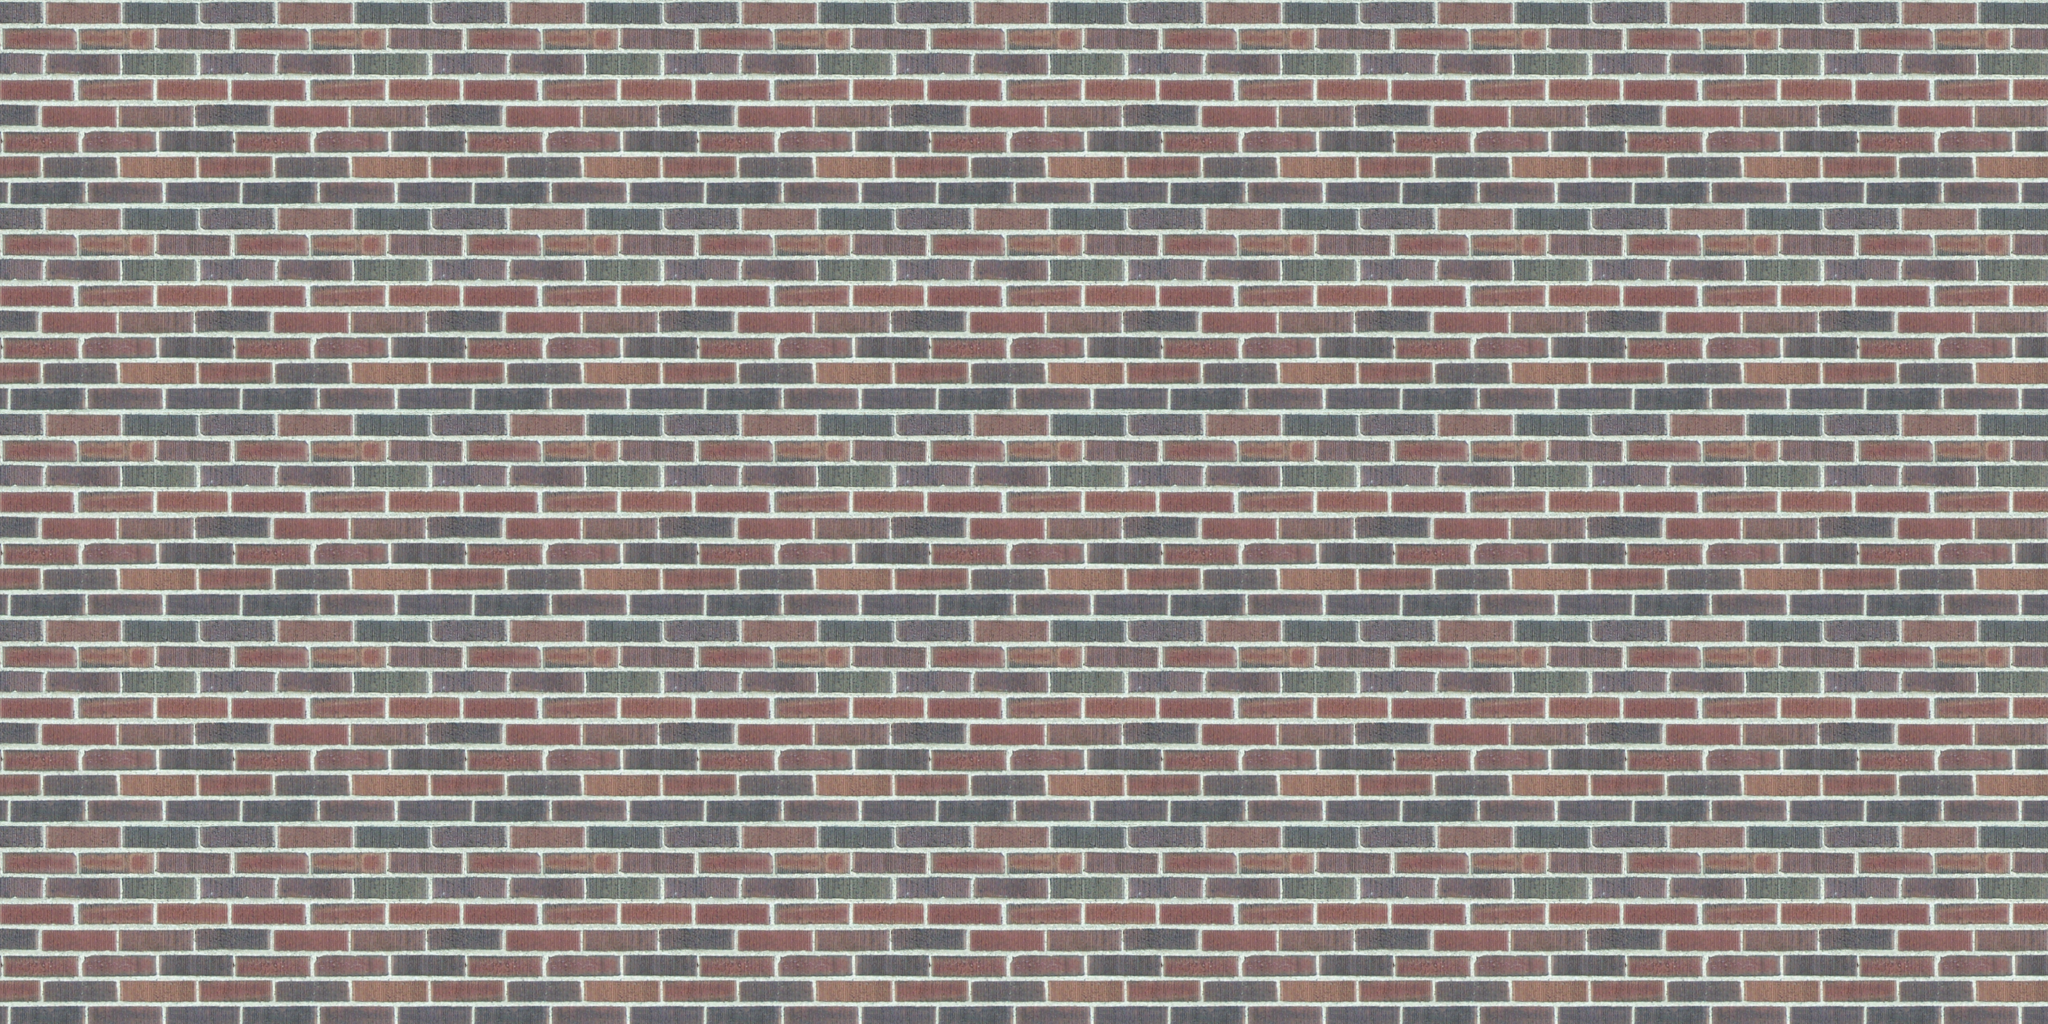
First, I started with an image of a brick wall. The original image is 2048x1024. Shown below is a small section of the original.
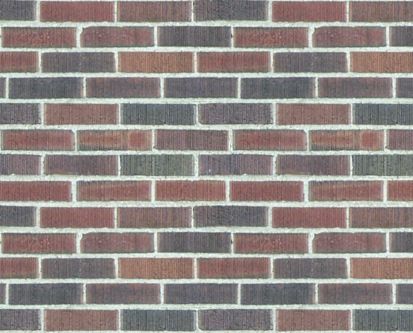
A one-twelfth size image should look something like the following, with tiny individual bricks still visible (barely) but at one-twelfth size:
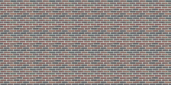
However when I create a 1:12 "pixel resize" (the equivalent of taking a photo with no antialias filter), I get the image shown below. The repeat pattern does not look much like bricks, and the most obvious repeat pattern (vertically and horizontally) is at a frequency very different from that of the bricks. The tiny bricks are still in there, but they are nearly completely obscured by the dominant horizontal bands and bright dots that result from aliasing.
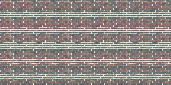
The reason behind this bizarre aliasing is easy to see. If a sample pixel fall on the bricks, it will obviously be a brick-colored pixel. If it falls on mortar, it will be light gray. If the sampling interval almost matches the brick spacing, the sampling will land on light gray pixels several times in a row, and then will land on brick red pixels several times in a row. The result is what we see in the above image. (Note: the fundamental frequencies of the bricks are not what is causing the aliasing above; it is their higher frequency harmonics that exceed half the sampling frequency and it is these frequencies that result in the dramatic aliasing.)
Aliasing is rarely seen with digital cameras, because digital cameras almost always use intentional blurring in front of the CCD to avoid aliasing. In most such cameras the filter is permanently installed, but some high-end cameras have a removable anti-aliasing filter just in front of the CCD. Many camera makers just design the blurring into the lens. (Those digitizing audio for CD's pass the music through a low pass filter before digitizing to accomplish a similar purpose.)
The absence of an antialiasing filter can cause dramatic Moire patterns even in real-world images. Below are comparison images by Dave Etchells of Imaging Resource using the Canon D60 (with an antialias filter) and the Sigma SD-9 (which contains no antialias filter). The bands below the fur in the image below at right are the kinds of artifacts that appear in images when no antialias filter is used. Sigma chose to eliminate the filter to get more sharpness, but the resulting apparent detail may or may not reflect features in the image.

These kinds of artifacts are impossible to remove after the fact, as they are indistinguishable from what could be real image detail. This is why there can never be an effective software antialias filter.
Scanners have no such antialias filter. The way to combat Moire patters in scanned images is to scan at higher resolution than you ultimately need, and then resample the image to smaller size. "Resample" means using a smart resizing method that employs a weighted average of many pixels, rather than a simple "pixel resize" that just selects a subset of the original pixels to create the new smaller image. (Paint Shop Pro's "Smart resize" uses resampling when downsizing.)
Because of the artifacts that result in the cases shown here, filtering should always be used when digitally sampling signals that could possibly contain information at more than half the sampling frequency.
Please e-mail matthews@wfu.edu with comments.
- For more discussion on aliasing in the Sigma SD9 (and aliasing in general), see Dave Etchells' excellent review of the SD-9.
- Miscellaneous tips and info
- Rick Matthews' home page
[an error occurred while processing this directive] [an error occurred while processing this directive]